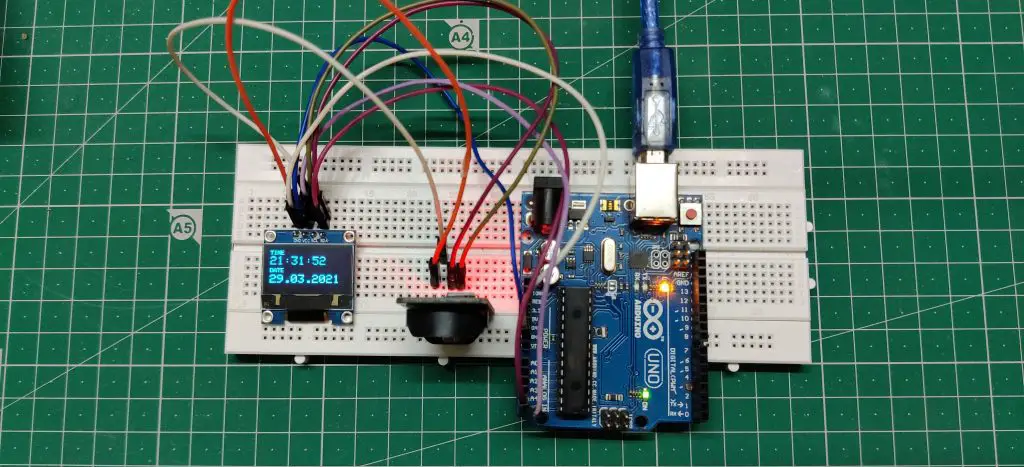
Find out how to make a Digital Watch utilizing an 0.96 inch OLED Show
What’s an OLED show?
The Natural Gentle Emitting Diode(OLED) show or often known as Natural EL Diode show is a sort of show that’s based mostly on an natural compound that emits gentle in response to the electrical present utilized to it. It’s a self-light emitting show that doesn’t require a backlight like a standard LCD show does. It may be interfaced with any microcontroller utilizing each SPI and IIC communication protocols. This sort of OLED show is available in numerous sizes and styles. On this mission, we will likely be utilizing a 0.96-inch OLED show. This show consists of 128×64 pixels that may be turned ON/OFF utilizing any microcontroller. In our case, we will likely be utilizing the Arduino UNO board.
Pin diagram of 0.96 inch OLED show

Options of 0.96 inch OLED show
- Enter voltage: 3.3-5V
- Working present: 9-12mA
- Working temperature: -40°C to 80°C
- Resolutions: 128×64 Pixels
- Driver used: SSD1306
- Interface: IIC and SPI
- Self-illuminating show
- Low energy consumption
- Very skinny show
Parts wanted for this mission
- Arduino UNO
- 0.96 inch OLED show
- DS3231 RTC module
- Breadboard
- Jumper wires
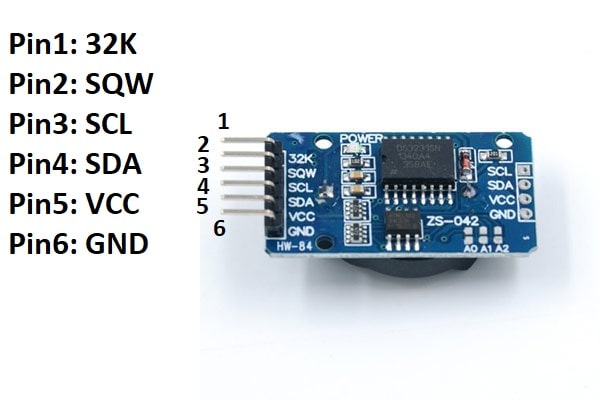
Pin diagram of DS3232 RTC module
Block diagram of this mission

Working of this mission
The principle goal of this mission is to create a digital watch utilizing an OLED show. Now, with the intention to get an correct time and date, now we have to make use of any RTC module. Right here, we are going to use the DS3231 module.
In our essential code, we are going to add a code to get each the time and date values from this module and retailer them into some variables.
Then, we are going to add the fundamental interfacing code of the OLED show in our essential code and show each the date and time worth on the OLED show.
Libraries wanted for this mission
Earlier than transferring ahead, obtain and set up all these libraries in Arduino IDE software program.
- https://github.com/adafruit/Adafruit-GFX-Library
- https://github.com/adafruit/Adafruit_SSD1306
- http://www.rinkydinkelectronics.com/library.php?id=73
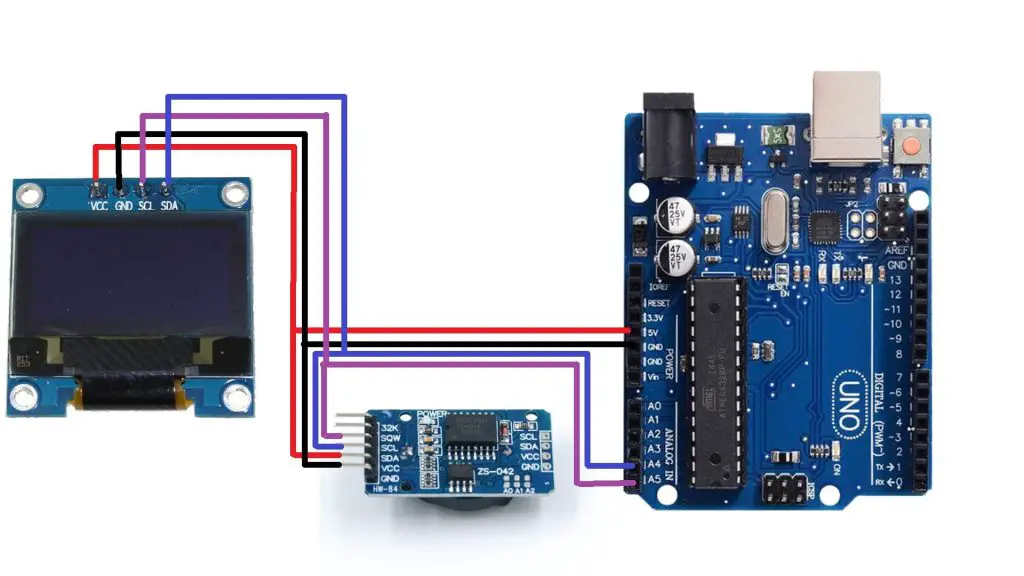
Circuit diagram of this mission
Step1: Set the information, time, and day of the RTC module. For that add the next code to the Arduino Board.
- Use rtc.setDay(Day_Name) operate to set the day; write the day identify in capital letters contained in the bracket.
- Use rtc.setTime(hh:mm:ss) operate to set the time; first, write hours, then minutes, and within the final write seconds.
- Use rtc.setDate(dd:mm:yyyy) operate to set the date; first write day, then months, and within the final write years.
#embrace "DS3231.h"
DS3231  rtc(A4, A5);
void setup()

  Serial.start(115200);
  rtc.start();


  rtc.setDay(MONDAY);
  rtc.setTime(13,2,2);
  rtc.setDate(2,5,2021);

void loop()
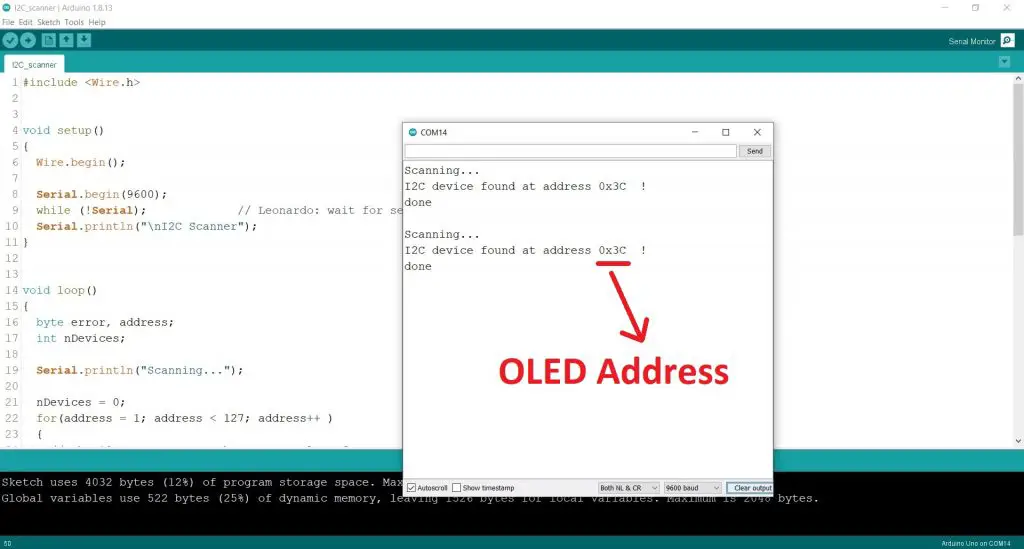
Step2: Discover the deal with of the OLED Show. For that add the next code in Arduino. Then open the serial monitor and observe the deal with of the OLED show. Join solely the OLED show to the Arduino, don’t join the RTC module. In any other case, you’re going to get three addresses.
#embrace <Wire.h>


void setup()

  Wire.start();

  Serial.start(9600);
  whereas (!Serial);
  Serial.println("nI2C Scanner");


void loop()

  byte error, deal with;
  int nDevices;

 Serial.println("Scanning...");

 nDevices = 0;
  for(deal with = 1; deal with < 127; deal with++ )


    Wire.beginTransmission(deal with);
    error = Wire.endTransmission();

    if (error == 0)

      Serial.print("I2C gadget discovered at deal with 0x");
      if (deal with<16)
        Serial.print("0");
      Serial.print(deal with,HEX);
      Serial.println("  !");

      nDevices++;

    else if (error==4)

      Serial.print("Unknown error at deal with 0x");
      if (deal with<16)
        Serial.print("0");
      Serial.println(deal with,HEX);


  if (nDevices == 0)
    Serial.println("No I2C units foundn");
  else
    Serial.println("donen");

  delay(5000);
Arduino code for this mission
Step 3: That is the principle code of this mission. Add this code within the Arduino.
#embrace "DS3231.h"

#embrace <Wire.h>
#embrace <Adafruit_GFX.h>
#embrace <Adafruit_SSD1306.h>

#outline SCREEN_WIDTH 128
#outline SCREEN_HEIGHT 64


#outline OLED_RESET     4
#outline SCREEN_ADDRESS 0x3C
Adafruit_SSD1306 show(SCREEN_WIDTH, SCREEN_HEIGHT, &Wire, OLED_RESET);

DS3231  rtc(A4, A5);
void setup()

  if(!show.start(SSD1306_SWITCHCAPVCC, SCREEN_ADDRESS))
    Serial.println(F("SSD1306 allocation failed"));
    for(;;);


void loop()
  show.clearDisplay();
  show.setTextSize(1); // Draw 2X-scale textual content
  show.setTextColor(SSD1306_WHITE);
  show.setCursor(0, 0);
  show.println("TIME");
  show.setTextSize(2);
  show.setCursor(0, 10);
  show.println(rtc.getTimeStr());
  show.setTextSize(1);
  show.setCursor(0, 30);
  show.println("DATE");
  show.setTextSize(2);
  show.setCursor(0, 41);
  show.println(rtc.getDateStr());
  show.show();      // Present preliminary textual content
  delay(100);
Working of this code
#embrace "DS3231.h"

#embrace <Wire.h>
#embrace <Adafruit_GFX.h>
#embrace <Adafruit_SSD1306.h>
First, embrace all of the libraries which can be wanted for this mission. We want DS3231 library for DS3231 RTC module, wire library for I2C communication, and Adafruit GFX and SSD1306 library for OLED show.
#outline SCREEN_WIDTH 128
#outline SCREEN_HEIGHT 64
Outline two constants to retailer the width and peak pixels of the OLED show. We’re utilizing OLED show that has 128 pixels in width and 64 pixels in peak.
#outline SCREEN_ADDRESS 0x3C Set I2C deal with of the OLED show
Adafruit_SSD1306 show(SCREEN_WIDTH, SCREEN_HEIGHT, &Wire, OLED_RESET);Go all of the parameters to the library.
DS3231 rtc(A4, A5); Outline SDA and SCL pins for the DS3231 RTC module. The A4 pin of Arduino is SDA pin and A5 pin of the Arduino is SCL pin.
void setup()
  Serial.start(9600);
  if(!show.start(SSD1306_SWITCHCAPVCC, SCREEN_ADDRESS))
    Serial.println(F("SSD1306 allocation failed"));
    for(;;);
Provoke the OLED show within the setup() operate. If the allocation is failed you’ll this message “SSD1306 allocation failed”
void loop()
  show.clearDisplay();
  show.setTextSize(1); // Draw 1X-scale textual content
  show.setTextColor(SSD1306_WHITE);
  show.setCursor(0, 0);
  show.println("TIME");
We’ll write our essential code within the loop() operate.
First, clear the show utilizing clearDisplay() command.
Then set the Textual content dimension utilizing setTextSize() operate. Write 1 contained in the brackets for 1X-scale, write 2 contained in the brackets for 2X-scale, and so forth.
Then set the colour of the textual content utilizing setTextColor() operate. If you happen to write SSD1306_WHITE, then all of the textual content will likely be proven in gentle coloration and background will likely be in darkish coloration. If you happen to write SSD1306_BLACK, then all of the textual content will likely be proven in a darkish coloration, and the background of the show will likely be proven in a light-weight coloration.
Then set the cursor place the place you need to show your textual content utilizing the setCursor() operate. First, write the column quantity and write the row quantity. Bear in mind now we have 128 columns and 64 rows as a result of now we have 128×64 pixels on this show.
Then print time on the show.
  show.setTextSize(2);
  show.setCursor(0, 10);
  show.println(rtc.getTimeStr());
Then set the scale of the textual content once more. This time we’re utilizing 2X dimension. Then set the cursor place once more and print the time. To get the time from the RTC module we are going to use the getTimeStr() operate.
show.setTextSize(1);
  show.setCursor(0, 30);
  show.println("DATE");
  show.setTextSize(2);
  show.setCursor(0, 41);
  show.println(rtc.getDateStr());
  show.show();      // Present preliminary textual content
  delay(100);
Equally, show the date on the OLED show. We’re utilizing getDateStr() operate to get the date from the RTC module.
And within the final give a delay of 100ms.
Output outcomes